You want to start developing with PHP and MySQL, but you don't want to mess around with installation of Apache, MySQL server, dealing with hosting companies etc.?
There is a way. And this way leads to the clouds! :)
You can develop and deploy your application within 5-10 minutes.
This tutorial can be used by beginners and advanced users.
All you need is just a web browser! :)
I have created a
YouTube Tutorial as well. It describes the same steps and it is only 15 minutes long. So in 15 minutes or less you can have an application up and running without the troubles of installing a development stack.
The key is a cloud IDE called "Codenvy". It allows you to create your app within seconds and Deploy it to a lot of existing "Platform as a Service", In this tutorial I will show how to do so with "AppFog". You can use not only MySQL but mongoDb, Redis etc. And you can develop not only PHP applications, but Java, Ruby etc.
All these steps can be executed from almost every computer or device in the planet that can run a web browser. You are free to use different computers, operating systems, browsers. Your development stacks and projects are always with you. And you can deploy your applications with a click of a button. :)
We are going to use 2 applications. Don't worry they are created with a click of a button. One of them is our real application. Another is temporary used just to deploy phpMyAdmin to be able to manage our MySQL service on AppFog. You can delete it from the IDE (Codenvy) after the deployment is done if you wish. :)
I have made a lot of screenshots. But don't worry! They are here not to confuse you, by explaining difficult concepts, but to make it easier for you, showing every simple dummy step. Also you can run them as a slideshow and even don't have to read the text in the post.
1) Go to
https://codenvy.com/ . Login or register. They support OpenID so you can login with github or google account.
2)You can start from scratch or if you already have a project in Codenvy you can open it. In this tutorial I will assume you are starting from scratch and you want to use PHP and MySQL
3) Give a name to the project. Choose the technology. It is PHP in our case. Choose the deployment platform. I am going to use AppFog as a PaaS. It is very good one. You application will become available online for a seconds. And you can choose from many DB services: MySQL, MongoDB, Redis etc.
4) Login with your AppFog username.password or go to
https://www.appfog.com/, register and get an account.
5) Select the infrastructure. AppFog has 4 infrastructures at the moment (AWS Asia Southeast, AWS Europe West, AWS US East, HP Openstack AZ 2). Select the infrastructure according to your customers.
6) And you are Done! :). Your "Hello World!" PHP application is up and running. It is also available to your customers to access it. But don't you worry. Only the people who know the URL can access it.
7) You are in charge. You have full control over the instance of your application directly from Codenvy
8) It is time to run a DB service on the infrastructure if you need one. You can do it directly from the IDE (Codenvy) or go to appfog.com and do it from their interface.
9) Lets do it from the AppFog interface (dashboard). Login to AppFog.
10) Find your running application. As you can see you have a full control.
11) Select "Services", because we want to use a MySQL service in our PHP application.
12) We have the service up and running, ready to be used in our PHP app.
13) But we want to be ablle to mange the DB server (MySQL) add, delete tables etc. We can achieve this using tunneling. But this requires installing software etc. There is an easier way, by using phpMyAdmin. So lets deploy and run an instance of phpMyAdmin on the same Infrastructure and manage the MySQL service. In order to do so we are using again Codenvy. It is extremely easy to deploy apps from the cloud IDE.
Start by creating a new Project in Codenvy which we will use to Deploy phpMyAdmin to AppFog infrastructure.
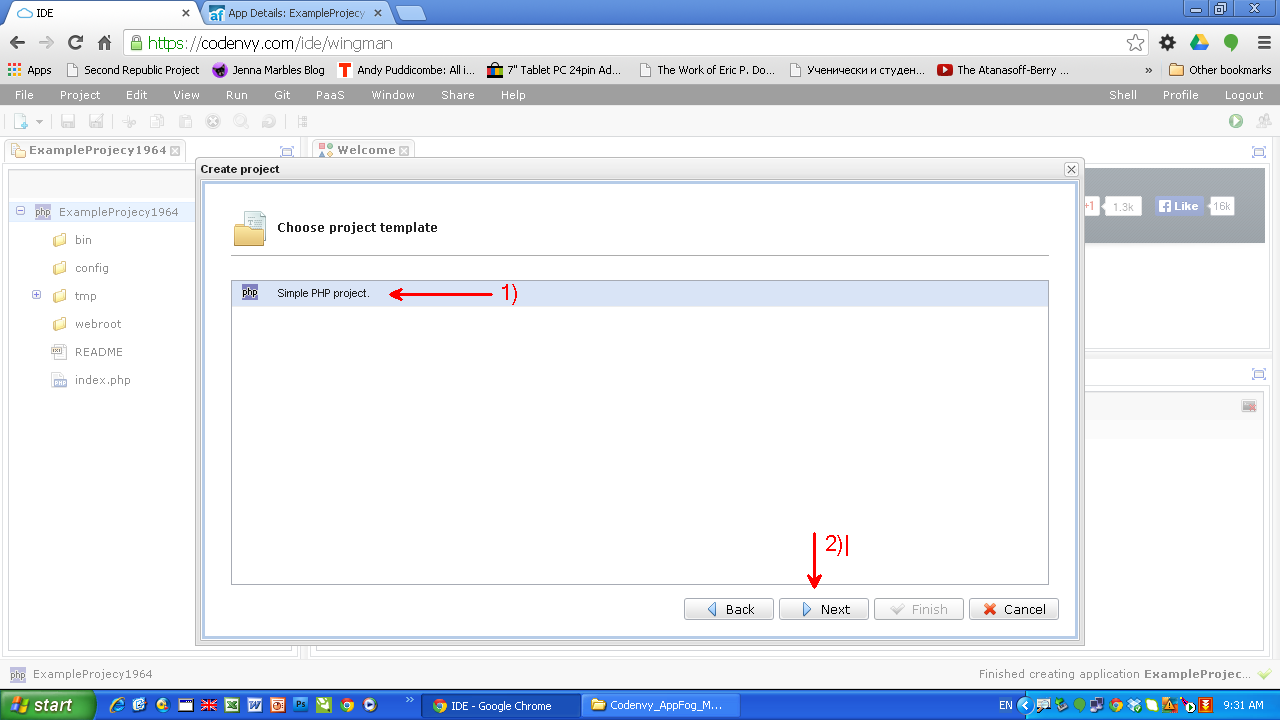
14) phpMyAdmin is a PHP application. This is the reason we start again with creating a PHP project and choose to deplaoy to the same PaaS (AppFog) on the same infrastructure as our running MySQL service
15) Check if your second app is running on AppFog.
16) We don't need any of the files from a Codenvy "Hello World" PHP app, so lets delete them.
17) We are going to use GitHub to pull the right version of phpMyAdmin from
https://github.com/appfog. This is a modified version of phpMyAdmin. Notice we are not downloading the original version of phpMyAdmin.
18) Go to
https://github.com/appfog and find phpMyAdmin there
19) Copy the address of the repo.
20) Add the remote repository address. This is the address of phpMyAdmin
https://github.com/appfog/af-php-myadmin
21) Pull the phpMyAdmin from the repo.
22) Deploy the phpMyAdmin to AppFog
23) Try to see if it has been deployed. It is there, but we have to do configuration before we start using it.
24) Go to AppFog and find the project from our phpMyAdmin.
25) Bind the running MySQL service to our phpMyAdmin application. We are going to manage the service with this phpMyAdmin.
26) Set up the password for our phpMyAdmin instance. In order to do so, we have to set an Environment Variable for our phpMyAdmin app in AppFog. Go to Env variables tab and enter PMA_PASSWORD to whatever password you want to use to access your phpMyAdmin.
27) After having completed the previous steps you can refresh the page with your phpMyAdmin instance to enter your username/password
28) As a username use your AppFog username (it is an email address) and as a password use the password you have set in the Environment Variable PMA_PASSWORD. You can change the username as well. All you have to do is set another variable PMA_USERNAME with the desired value and in this case when you login to your phpMyAdmin instance instead of using your AppFog username you can use the username you have set up with the variable PMA_USERNAME
29) Congratulations! You have setup your instance of phpMyAdmin. You can create, drop tables etc. You are in charge.
30) You can go back to your original application now in Codenvy. You can delete from your IDE (Codenvy) the extra application we have created for phpMyAdmin. Or you can keep it there. :)
31) There is one more thing. How to connect from our app to the MySQL server? All the connection information is in an Environment Variable called VCAP_SERVICES. It is a JSON object. So you can convert it to an PHP array and get the username, password, database name etc. for your MySQL instance. You can find an example code on how to parse and use the values in
pastebin.com
32) You are in charge of your running application on AppFog and the services. You can Stop, Start, Remove etc. the instance of your application or you can manage the services directly from Codenvy if you like.
33) In order to remove the service you can go to AppFog and do it from their interface.
I hope you enjoyed the tutorial! If you find it useful share, comment and like.
Have fun! :)


Your information is nice
ReplyDeletePHP Development
really you have posted an informative blog. it will be really helpful to many peoples who are all working under the technology.
ReplyDeletejava training in chennai
This is good post about the php web design. The use of PHP language in web development increased in last few years. PHP is open source, user friendly and easy to use language.
ReplyDeletephp development melbourne | node.js development
Thank you for allowing me to read it, welcome to the next in a recent article. And thanks for sharing the nice article, keep posting or updating news article.
ReplyDeleteClick here:
python training in Bangalore
Click here:
python training in Bangalore
This comment has been removed by the author.
ReplyDeleteIt seems you are so busy in last month. The detail you shared about your work and it is really impressive that's why i am waiting for your post because i get the new ideas over here and you really write so well.
ReplyDeleteData Science training in Chennai | Data science training in bangalore
Data science training in pune | Data science online training
Data Science Interview questions and answers
Needed to compose you a very little word to thank you yet again regarding the nice suggestions you’ve contributed here.
ReplyDeletejava training in marathahalli | java training in btm layout
java training in jayanagar | java training in electronic city
Well somehow I got to read lots of articles on your blog. It’s amazing how interesting it is for me to visit you very often.
ReplyDeleteangularjs-Training in tambaram
angularjs-Training in sholinganallur
angularjs-Training in velachery
angularjs Training in bangalore
angularjs Training in bangalore
angularjs Training in btm
Does your blog have a contact page? I’m having problems locating it but, I’d like to shoot you an email. I’ve got some recommendations for your blog you might be interested in hearing.
ReplyDeleteAWS Training in Velachery | Best AWS Course in Velachery,Chennai
Best AWS Training in Chennai | AWS Training Institutes |Chennai,Velachery
Amazon Web Services Training in Anna Nagar, Chennai |Best AWS Training in Anna Nagar, Chennai
Amazon Web Services Training in OMR , Chennai | Best AWS Training in OMR,Chennai
Amazon Web Services Training in Tambaram, Chennai|Best AWS Training in Tambaram, Chennai
AWS Training in Chennai | AWS Training Institute in Chennai Velachery, Tambaram, OMR
Thanks for the great content! keep uploading more post.
ReplyDeleteselenium training and placement in chennai
software testing selenium training
iOS Training in Chennai
French Classes in Chennai
Big Data Training in Chennai
web designing training in chennai
Best web designing institute in chennai
Best web designing course in chennai
Thanks for taking time to share this information with us.
ReplyDeletePython Classes in Chennai
Python Training in Velachery
RPA course in Chennai
Angularjs Training in Chennai
Data Science Training in Chennai
Data Science Course in Chennai
I simply want to give you a huge thumbs up for the great info you have got here on this post.
ReplyDeleteangularjs online training
apache spark online training
informatica mdm online training
devops online training
aws online training
Some us know all relating to the compelling medium you present powerful steps on this blog and therefore strongly encourage contribution from other ones on this subject while our own child is truly discovering a great deal. Have fun with the remaining portion of the year.
ReplyDeleteMicrosoft Azure online training
Selenium online training
Java online training
Python online training
uipath online training
Informative post indeed, I’ve being in and out reading posts regularly and I see alot of engaging people sharing things and majority of the shared information is very valuable and so, here’s my fine read.
ReplyDeleteclick here to change your password
click here to claim your ecard
click here to continue your profile creation
click here to connect
click here to check the status of your arn
Thanks for sharing! We keep up with the latest techniques of building and have qualified tradesmen to ensure that your job/project is carried out safely. We also make sure that we keep to the highest standards on projects .
ReplyDeleteMachine Learning Training In Hyderabad
I found your blog while searching for the updates, I am happy to be here. Very useful content and also easily understandable providing.
ReplyDeleteHadoop Training in Hyderabad
Nice Blog. thank for sharing this blog. every content should be very Informative.
ReplyDeleteData Science Training Course In Chennai | Data Science Training Course In Anna Nagar | Data Science Training Course In OMR | Data Science Training Course In Porur | Data Science Training Course In Tambaram | Data Science Training Course In Velachery
Hey, would you mind if I share your blog with my twitter group? There’s a lot of folks that I think would enjoy your content. Please let me know. Thank yougood luck.
ReplyDeleteAi & Artificial Intelligence Course in Chennai
PHP Training in Chennai
Ethical Hacking Course in Chennai Blue Prism Training in Chennai
UiPath Training in Chennai
Thanks for sharing the awesome information with us.
ReplyDeleteAngularJS training in chennai | AngularJS training in anna nagar | AngularJS training in omr | AngularJS training in porur | AngularJS training in tambaram | AngularJS training in velachery
ReplyDeleteThe Content You Shared With Us Is Excellent & Extraordinary Useful to all Aspirants Thanks For Sharing With Us!
Best Degree College In Hyderabad
Top Degree College In Hyderabad
Top And Best BBA College In Hyderabad
Top And Best B.Com College In Hyderabad
good blog!!!
ReplyDeleteandroid training in chennai
android online training in chennai
android training in bangalore
android training in hyderabad
android Training in coimbatore
android training
android online training
Learn Amazon Web Services for excellent job opportunities from Infycle Technologies, the best AWS training center in Chennai. Infycle Technologies gives the most trustworthy AWS course in Chennai, with full hands-on practical training from professional trainers in the field. Along with that, the placement interviews will be arranged for the candidates, so that, they can meet the job interviews without missing them. To transform your career to the next level, call 7502633633 to Infycle Technologies and grab a free demo to know more.Best AWS Training in Chennai
ReplyDeleteNew site is solid. A debt of gratitude is in order for the colossal exertion.
ReplyDeletedata scientist course in hyderabad
bookmarked!!, I like your site!
ReplyDeletebest interiors
Very useful post. This is my first time i visit here. I found so many interesting stuff in your blog especially its discussion. Really its great article. Keep it up.
ReplyDeletedata analytics training in hyderabad
Informative blog, nice content. Thanks for writing this blog.
ReplyDeleteAI Patasala Data Science Courses
They're produced by the very best degree developers who will be distinguished for your polo dress creation. You'll find Ron Lauren inside an exclusive array which includes particular classes for men, women.
ReplyDeletebusiness analytics course in hyderabad
Mmorpg Oyunlar
ReplyDeleteİNSTAGRAM TAKİPÇİ SATİN AL
tiktok jeton hilesi
TİKTOK JETON HİLESİ
SAC EKİMİ ANTALYA
referans kimliği nedir
İnstagram Takipçi Satın Al
Mt2 pvp serverler
TAKİPCİ
TÜL PERDE MODELLERİ
ReplyDeletesms onay
Vodafone Mobil Ödeme Bozdurma
nft nasıl alınır
ankara evden eve nakliyat
trafik sigortasi
dedektör
web sitesi kurma
aşk romanları
ataşehir arçelik klima servisi
ReplyDeletemaltepe mitsubishi klima servisi
kadıköy mitsubishi klima servisi
kartal vestel klima servisi
kartal bosch klima servisi
kartal arçelik klima servisi
ümraniye arçelik klima servisi
beykoz mitsubishi klima servisi
maltepe samsung klima servisi
özel ambulans
ReplyDeleteen son çıkan perde modelleri
uc satın al
minecraft premium
nft nasıl alınır
lisans satın al
yurtdışı kargo
en son çıkan perde modelleri
Great Blog.
ReplyDeletealso, join our SQL classes in Pune