Monday, February 3, 2014

Google and other tools for business

Google offers a complete solution for our businesses. They started 2013 as far as I remember to offer such solution under your own domain name. Google is still organically growing and finding its way. So what are the tools and services Google offers and how to combine them to get a business solution?

1) When you register you get an e-mail address. Gmail is the central point for your messaging. When you are there you can send and receive instant messages from Google+ (Hangout)

2) Google+ is a social network. Allows us to create circles and do micro blogging. Follow and be followed. It  is integrated with Google Hangout. You can start a hangout with a friend exactly the same way you do it in facebook.com

2.1) facebook.com - the most popular social network. I can create very easy a pages and applications (page tabs with the use of Google Sites or another pages). A very good tutorial on How to Create Apps for Facebook Pages. It is a bit outdated but you can figure out the differences. The guy is using Google Sites to create pages for his "Page Tab" apps.
2.1.1) developers.facebook.com - the site where you create your facebook apps.


2.3) twitter.com - One of the most important social networks on the planet.

3) Google Hangout and Google Hangout on Air. I see only Google Hangout on Air as a separate product. Google Hangout is for me mostly a part of Google+.

3.1) Google Hangout on Air is very well integrated with YouTube. You can invite up to 9 atendees to your hangout. It gets broadcasted live and recorded in HD (720p) in your YouTube account. It is like a dream. Unlimited amount of people can watch it live. All your friends in Google+ get notified you just started a Hangout on Air together with a link to it. You have your broadcast TV studio. You can have your own TV show. And on top of that can be found and watched later. It stay in the archive. What else can we ask for? :) Maybe there is much more to ask, but for now it is OK.

4) YouTube allows us to upload the videos from out phones cameras etc. I use Camtasia to record tutorials (screencasts) and upload them to YouTube organizing them in Play Lists.

5) Blogger is another service used by me. Even this post is there. I can add pictures very easy. Convert a draft to publication and vise versa. I can create posts at will in very user friendly environment. Adding media is a very easy. You get your blog under the google domain. (myblog.blogspot.com). You have integrated analytic tools. You can change the design in a blink of an eye. You have a lot of gadgets (widgets) and many more. Just start your own blogs very easy.

5.1) Talking about blogs I think we have to pay attention to "Wordpress". They offer hosted solution for their popular Open Source Product. This makes it very easy and conveniant to use. You can create a blog under their domain name (e.g. myblog.wordpress.com). So you have the freedon of choice and self host it or use the hosted solution. Most of the hosting providers allow you to install Wordpress trough "Softacolous" or manually. All you need is a host with a web server (e.g. Apache) PHP and MySQL. You can insytall it in another configuration as well.

6) Talking about business we can not avoid Google Webmasters. It allows us to analyse the traffic optimize the site. As they say "You want to be found in the network? We want to help you. Get data, tools and diagnostics for a well working and searchable by Google site."
All you have to do is just verify the site is yours or you are in charge. You do that by uploading a "html" file (e.g. google3427C326BA324.html) to the root of the site you want to take care of. Somehow without adding code to any pages Google Webmaster gives you useful data. All you have to do is just click "Add Site" button, add the URL, download the verification file and upload it to your site to verify you are the webmaster. The tools helps you build better searchable by Google sites. It is very well integrated with Google Analytics . As a webmaster you can add as many site as you wish all you have to do is verify you are the webmaster by uploading a file given by Google. This is a one stop shop for all webmasters.

You link the webmasters tools to a property in Google Analytics.


7) Google Analytics allows us to be better marketer. It can be integrated with Google Webmasters.
As Google says:
"Why Google Analytics?
Whether you want to boost sales, find more visitors or improve your mobile app, Google Analytics has the answers and insights you need to improve your business."
You have to add Java Script code to your pages or template of the site to gather the information about the visitors. You can see where they are coming from, how did they found you etc. All sorts of useful information.
If you want to add a new property:

For each property you get an unique identifier (e.g. UA-432442342-1). Use this identifier when you create a site in Google Sites. In other cases you just copy and paste the provided JS code.

7.1) statcounter.com is an alternative. You have to add a Java Script code to the template or the pages of the site

8) Google Sites allows us to create sites of type brochure on a very easy and intuitive way. It is so east to add content, change the design etc. It looks like blogger but it is for more static sites.
It is like Joomla, Wordpress, Drupal or any other Content Management System you can think of. But it is already hosted for you. Perfect for building single pages or small sites. For example pages for facebook can be build in Google Sites.


9) Google Drive - whole new world! It is formerly knows as Google Docs. It doesn't simply stores your files. You can create and edit the documents in your browser. This is what makes Google different. For example Drop Box also offers cloud storage and sharing but you have to download the document before start editing it. In Google Drive you create the document directly in the browser. You don't have to download or upload. It opens the common formats like .doc, excel, Power Point, Adobe Illustrator, PDF etc. There are a lot of applications you can use to create files. And there are a lot of third party applications too.


10) Google App Engine. At Google I/O 2013 Google has opened the Pandora Box by adding PHP to the supported languages in App Engine. Imagine Word press installed on Google AppEngine or Joomla or a ZF2 application. No limits anymore. The PHP developers are unlieshed. You also can use a custom domain name your app on Google App Engine. The prices start from $8 USD. For 10 EUR I have a custom domain. In order to do so on App Fog you also have to pay.
Google App Engine is a product from Google Developers.

Google App Engine supports the following languages: Python, Java, PHP, Go.
It also supports MySQL compatible Cloud SQL.

The URL address where your app is running will look like my-site-app.appspot.com. If you want to have your own domain you have to use  Google Apps for Business

With all Google services we don't need a hosting company anymore to start our online business.


App Engine is free of charge if you don't go beyond the free quotas. Learn more

In Application settings you can find the default URL etc.

You can serve your application from custom domains not only as a sub domain of appspot.com. Learn more about using custom domains. You can use Google Apps For Business to register a domain and use it for your app.

You must sign up for Google Apps for business to register the domain name or prove you own it.

Important: You must Sign Up for Google Apps For Business in order to use custom URL in Google App Engine. You can register a new one or prove you are the owner of the domain name you want to use.

I didn't try with an existing domain name. I have created a new one with Google Apps for Business. I will add in my ToDo list to create a domain name on namecheap.com for example and try to use it with Google Apps For Business. It is a paid service. So another words if you want to use your own domain name you have to pay. You have to pay for such services on AppFog as well.


10.1) Codenvy is an Cloud based SaaS IDE build for Java but supports other technologies also including PHP, Python, Java, technologies we can use in Google App Engine. The most Important for this article is maybe the fact that Codenvy works with many PaaS and one of them is Google App Engine. It is extremely easy to create or pull app from git (e.g. phpcloud.com) and deploy to Google App Engine. We really can have Wordpress, Joomla, Magento etc. on Google.

10.2) phpcloud.com is the Zend Cloud Platform (PaaS) where you very easy can create and deploy PHP Project, ZF1, ZF2, Joomla, Wordpress, Magento, phpBB. You may choose to work on your computer and use git or SFTP to push the changes or you can use some of the cloud SaaS like Codenvy or Cloud9

10.3) Cloud 9 is another cloud based IDE (SaaS)

10.4) Codiad is a self hosted broser-based IDE.  You can read more about such solutions on "13 Cloud IDEs For Web Developers - Hongkiat" or "The Top 3 Browser-Based IDE's To Code In The Cloud - MakeUseOf".

11) Google Developers is the place where you can find everything you need to start developing any kind of application. if you scroll down on the page and click on the "App Engine Console" you will get to your applications. They offer projects hosting, optimization tools etc.


12) Google AdWords allows you to advertise. As Google says: "Want to grow your business? Put your message in front of potential customers right when they're searching for what you have to offer."

13) Google AdSense allows you to display adds on your site and earn money from the visits.
This is what Google says: "Google AdSense provides a free, flexible way to earn money from your websites, mobile sites, and site search results with relevant and engaging ads."

14) Google Calendar helps me to be better organized. It is just great.

15) Google Group - for creating communities (mail lists). For example jQuery first had mail list on Google.

16) PayPal allows you to have a shopping cart or buttons. The easiest and most trusted way to pay and get payed online!

Bellow I describe a paid service, but you get your own domain name. We don't need a hosting company anymore. :)
17) Google Apps for Business Service that allows you to have a lot of services mentioned above, but under your domain name. When you choose your domain name don't use too many words or abreviations. Don't use dashes to separate words! Use simple word or words which is easy to remember and guess. Having a good domain name is the key for SEO.

There are a lot of services available in the apps.


This is how I can compare Hosting Company to Google Apps For Business

17.1) Domain Registration. With Google Apps For Business you create 1 domain per account and you have the entire Google infrastructure under this new name.
17.2) E-mails set up. You can have as many e-mail as you need.
17.2) Sites creating subdomains
17.3) You can use Google App Engine to run your PHP app for example.
17.4) Google Drive is much better than what a Hosting Company can offer.

Summary: With Google we can start our online business without coding skills. It is a new approach and replaces the Services of the Hosting Companies.

ToDo: take a look in "G:\screenshots\google_webmasters_analytycs" and G:\screenshots\facebookCreatePage"


Thursday, January 23, 2014

Csn modules. How everything works together?

This is a draft version of the post. If I have time I will improve it.
When I think about our application I think for it like a factory. A company producing something. In our case data. So this is how it looks:

fig. 1
Every controller is a building. Inside of each controller we have actions (methods=functions). Think about the actions like machines. They can do different things.
Everything is OK, but we don't have control who is using our machines. We want to know who is the user. We want to control the access. In order to do so, we need Authentication and Authorization systems.
CsnUser provides us with Authentication and Registration system. CsnAuthorization provides us with Authorization.
1) Lets talk about the Authentication system. It is base on the PHP sessions. On its turn the session in PHP rely on cookies, but not always. The session can exist without cookies. Cookies is a server technology. It shows up on the computer of the client (browser), but it is a server technology. Since http is a stateless protocol, the server don't remember the users. This is the reason the server asks the browser to save cookies on the clients machine (browser). In the case of PHP the variable is called PHPSESSID. Lets see if we can see this.
On the screenshot above we see the Zend Skeleton application just started. The Csn modules have been installed. The session gets started automatically.
I will take advantage of the fact that my server is on the same computer so lets see how the session looks on the clients browser and the server. In the screenshot above you can see the cookie "PHPSESSID" and it value. A file with the same name as the PHPSESSID value has been created in the temp folder on the server "C:\WINDOWS\Temp\sess_jnd4lc08v70jq4ld79ouinu4n5". "C:\WINDOWS\Temp" is the default temp folder wor Windows. The session can be stored in a database. All we need is just to prepare a handler in PHP. I usually do that. But for the purposes of this blog post I will continue using a file to store the session data. So there is a cookie called "PHPSESSID" set on the client computer. Is value determent the unique identifier (name of the session file) on the server where all the session variables get serialized and saved. I believe they are serialized.

In the screenshot above we see the content of the session on the server. The name of the cookie "PHPSESSID" can be changed in the php.ini settings. There we have control on the expiration time as well.

3-4 hours later lets see if the session id is the same. Another words lets check the value of PHPSESSID cookie in the browser and the corresponding file on the server. I will refresh the page http://localhost:10127/.
The cookie stays there and the value is not changed PHPSESSID = jnd4lc08v70jq4ld79ouinu4n5

The next thing we will do is log in and see how this will change the value of the session file.


The content of the session file has been changed:


__ZF|a:1:{s:20:"_REQUEST_ACCESS_TIME";d:1390316716.3404560089111328125;}Zend_Auth|C:23:"Zend\Stdlib\ArrayObject":145:{a:4:{s:7:"storage";a:1:{s:7:"storage";a:1:{s:2:"id";i:1;}}s:4:"flag";i:2;s:13:"iteratorClass";s:13:"ArrayIterator";s:19:"protectedProperties";N;}}

The information about the user was retrieved from the DB and saved in the session. So it can be easily accessed. The magic happens in the loginAction

The controller which takes care of the Authentication is a controller like every other. Everybody should have access to it in order to log in. I will try to explain how this works in the real life.

Whoever enters our domain (the green circle) gets a session ID. A cookie PHPSESSID gets set for the domain http://localhost:10127/. The server keeps a corresponding file or database record. Variables can be saved on the server about the session. The module "CsnUser" and its controller "IndexController" "loginAction" takes care of that. Another words our server attaches an identification card to every visitor of our domain. The loginAction looks to me like a desk of the security guards. Everywhere in the application we can call the "Zend\Authentication\AuthenticationService"
This service will provide us with the identity information. This is a security guard who checks the credential and sets the identity. I would imagine the stranger visiting our domain (site) going to Authentication controller and asking the guard: "Please, I want to be identified. My username and password are such and such. The guard goes in the back to the database room and checks for such username and password. If there is a match it retrieve the information from the database. After that the information gets written by the guard on a cart that stays on the guards desk (session). There is an unique ID attached to every visitor (the session ID). The visitor carries around his/her ID. The very same ID is written on the card that lies on the guards desk. This is how the correlation between the user and the card has been made. The session will expire in a give period of time. Usually after 22 minutes by default. Another words if the visitor doesn't show up again in our domain within 22 minutes the guard will destroy the card with the information about the visitor. The session will expire.

Once we can identify the visitor lets control the access to the controllers and the actions. This is done using so called ACL = Access Control List. ACL deals with 3 terms: Resources, Roles, Privileges. It looks like a human written list for access. It describes what role has access to what resource. The module CsnAuthorization takes care of that. The acl.global.php.dist is a good example.In the module CsnAuthorization we create a guard that takes care of everyone who trys to get to a Controller = Building in application. It is an event listener defined in the Module.php of the CsnAuthorization module.

What it does is the following: 
1) Calls the Authentication Service. If we continue the comparison with the factory it calls the guards taking of the Authentication asking them "Do you know this guy?". If they don't know him, he will be treated as "guest". If they know him we get the role of the visitor.

2) Asks the router: "Where are you going?" Give me the Controller = Resource and the action = privilege.

3) Calls the girl in the office and asks her to check the Access Control List. The question is: "Please check if a visitor with the given role is allowed to access the Resource and has the privilege to execute the given action."

After doing log out the cookie was replaced by another one "sess_pm2jiqtluiqfb4vfeqcodsdrv4" and this is the content:
__ZF|a:1:{s:20:"_REQUEST_ACCESS_TIME";d:1390322840.41504192352294921875;}Zend_Auth|C:23:"Zend\Stdlib\ArrayObject":112:{a:4:{s:7:"storage";a:0:{}s:4:"flag";i:2;s:13:"iteratorClass";s:13:"ArrayIterator";s:19:"protectedProperties";N;}}


Our guard in AclAuthorizaton collects data from 3 sources as I described above. You can see this in the picture. You can see the code snippet bellow.

There is a module for navigation CsnNavigation
It is an Object Oriented approach gibing us better control from inside of the application. But I think it becomes even more useful when it is combined with the ACL. We have done exactly this in the module CsnAclNavigation.
Lets take a look how it works. I will compare it again with a real life example from our factory.

To see how that works you can take a look the code.
Or you can see the snippet bellow:

Tuesday, December 3, 2013

How to use Codenvy and GitHub together.

In "Easy, simple develop and deploy PHP, MySQL applications using the cloud. Manage the MySQL service."  I showed to you how to get started with PHP/MySQL development/deployment in the most convenient, easy and simple way using only cloud technologies. All you need is only a web browser. In this tutorial I will show you how to use Source Control Management (SCM)/ Version Control System (VCS) such as Git to track your revisions and share the project in GitHub or another Hosting service of choice.

There is also a YouTube Tutorial on the same topic.

You don't need to carry around flash drives DVDs or a computer. You can use any computer/device in the world. All you need is Internet and web browser. Your development stack(s) and projects just follow you and they are stored safely somewhere in the cloud. :)

All you need is again only a web browser!

I have made a lot of screenshots. Don't let this scare you. :)
I just explain everything step by step. And I think more screenshots will actually help you.

So if you have already created  an application in Codenvy you can push it to GitHub and I am going to explain how it is done. If you want to knwo how to create a PHP application in a very easy and convenient way please read my tutorial "Easy, simple develop and deploy PHP, MySQL applications using the cloud. Manage the MySQL service."

1) Just open the project you want to push to GitHub or another SCM hosting service. (e.g. bitbucket)

 2) We have to generate RSA key pair in order to allow Codenvy and GitHub to exchange data securely. In order to do so you have to go to Window->Preferences in Codenvy.
 3) Hit "Generate Key"
 4) Enter the domain name of the hosting service. In our case "github.com"
 5) The RSA key pair has been generated. You can see the public key by clicking on "view"
 6) Copy the public key.
 7) Go to your GitHub account settings -> SSH keys and add the public key.
 8) Paste the public key and give it a name.
 9) You will be asked to enter your credential again.
 10) The key has been stored in GitHub. So Codenvy holds the private key and Github has the public key now. These 2 services can communicate using a secure protocol.
 11) It is time to create a repository for our project, which exsists so far only in Codenvy.
 12) Give it  a name.
 13) You have to choose SSH. (Remember from step 10 we are using RSA key pair)
 14) Initialize a repository in Codenvy.
 15) Add all files and folders.
 16) Add the address to your GitHub repository which will hold your project files.

 17) Just make sure you use the right address of the repository. It should be SSH address.

 18) Lets add all the files and folders we want to be under the control of the SCM (Git).

19) Lets commit. This is adding the files to the local database of Git

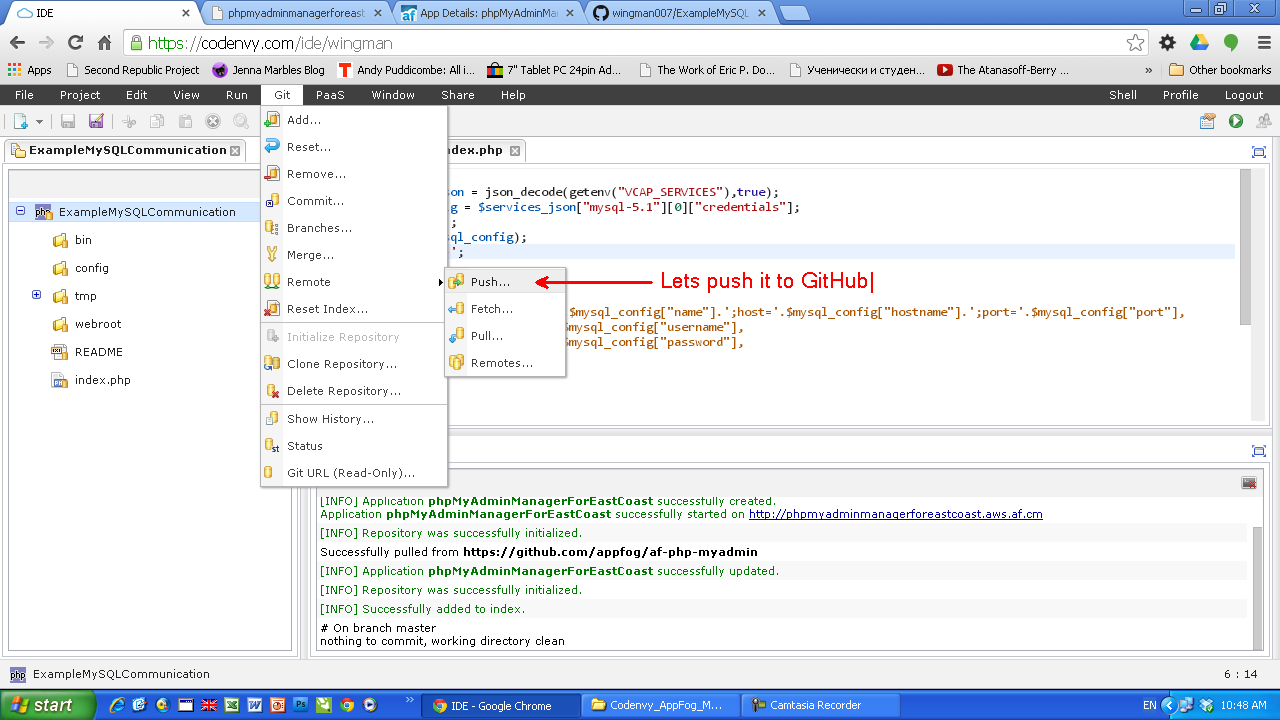
 20) Lets push our local files to GitHub.

 21) refresh to make sure all files have been uploaded to the remote (origin) repository.


I hope you find this tutorial useful. Just like, share and comment.
Have fun! :)